Working in Team: From Basic to Professional GitHub
Capstone Design
Imron Rosyadi
Collaborative Workflow for ECE Software Projects
Learning Objectives
By the end of this session, you will be able to:
- Set up and configure your GitHub account and local tools.
- Clone a team repository and work locally using VS Code.
- Commit and push changes so your team can see your work.
- Explain why professional teams use branches, pull requests, and protected main.
- Create a feature branch, open a Pull Request (PR), review code, and handle merge conflicts.
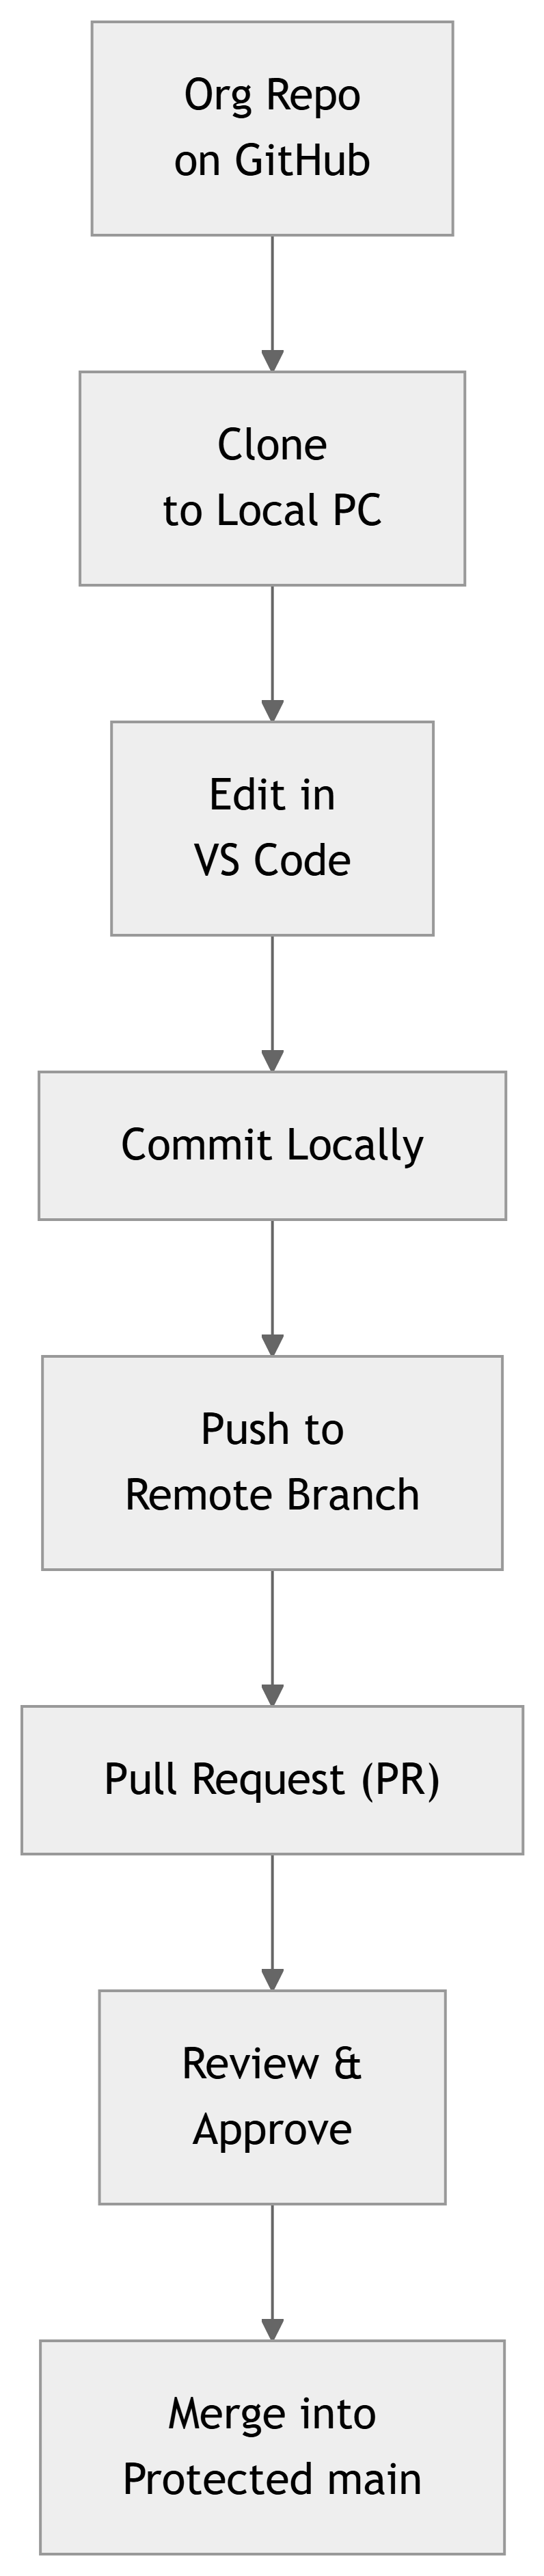
Big Picture: How Teams Use GitHub
- GitHub is more than file storage; it’s a collaboration platform.
- Your team works in a shared Organization with a shared repository.
- Each of you:
- Works on your local copy.
- Sends changes back to the remote repo.
- Uses pull requests to get code reviewed before it reaches
main.
1. Setting Up Your GitHub Account
Before writing code, you need a GitHub identity.
- Go to https://github.com and click Sign up.
- Use your student email address if possible:
- May unlock the GitHub Student Developer Pack (free tools and credits).
- Verify your email.
- Turn on Two-Factor Authentication (2FA) for security.
- Action: Share your GitHub username with your instructor.
Important
Why 2FA matters for engineers
Losing access to your GitHub is like losing access to your lab notebook, code, and design files at once. 2FA is required in many companies and research labs.
2. Installing Your Toolkit
To work efficiently, install these three tools:
| Tool | Purpose |
|---|---|
| Git | Version control engine tracking changes to your code. |
| GitHub Desktop | GUI to manage repositories without the command line. |
| VS Code | Editor/IDE where you write and edit code. |
- Download Git: https://git-scm.com/ (accept defaults).
- Download GitHub Desktop: https://desktop.github.com/.
- Download VS Code: https://code.visualstudio.com/.
3. Getting Into the Organization and Team Repo
Once your instructor adds you to the GitHub Organization:
- Accept the email / in‑GitHub invitation.
- Go to the Organization’s main page.
- Find your team repository, e.g.,
Team-A-Project. - Click the green Code button.
- Select Open with GitHub Desktop.
Tip
If “Open with GitHub Desktop” doesn’t appear, first install GitHub Desktop and sign in with the same GitHub account.
4. Cloning: Getting a Local Copy
When you “Open with GitHub Desktop,” it will ask: Where should I save this?
- This process is called cloning.
- Choose a folder you’ll remember, e.g.,
Documents/GitHub/Team-A-Project. - Click Clone.
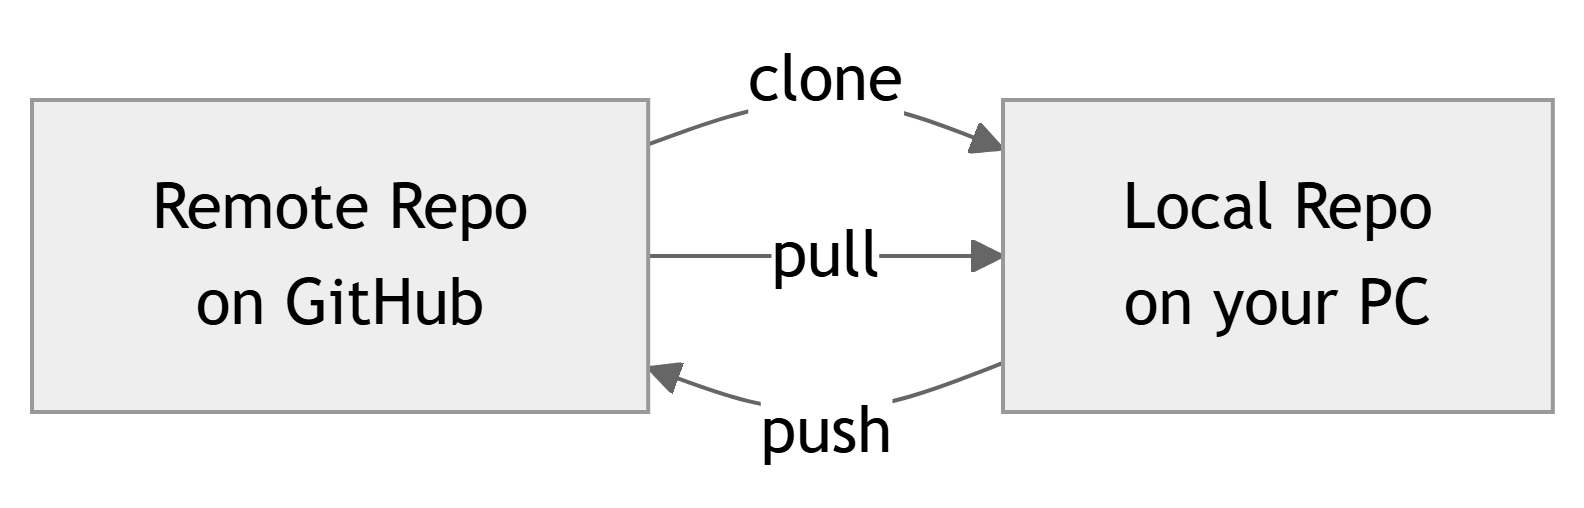
Conceptual View
- Remote repository: lives on GitHub servers.
- Local clone: full copy on your laptop.
- You always edit the local copy, then sync with the remote.
5. Opening the Project in VS Code
With the repo cloned:
- In GitHub Desktop, select your repository.
- Click Open in Visual Studio Code.
- VS Code opens directly in the project folder.
Inside VS Code:
- Left sidebar shows Explorer with project files.
- Click a file to open it.
- Create new files as needed (e.g.,
index.html,script.js,main.c,filter.py). - Save frequently: Ctrl+S (Windows/Linux) or Cmd+S (macOS).
Warning
Git only tracks saved changes. If you forget to save, your work is not in the next commit.
6. Local Changes → Commit → Push
Once you’ve completed a small task or feature:
- Switch to GitHub Desktop.
- You’ll see a list of changed files.
- Write a Commit Message (bottom left).
- Example:
Add UART initializationorFix FFT windowing bug.
- Example:
- Click Commit to main (or current branch).
- This saves a snapshot in your local repo.
- Click Push origin (top).
- This uploads your commit(s) to the GitHub remote.
Note
Think of a commit as a checkpoint in your lab notebook. Push sends that checkpoint to the shared notebook on GitHub.
7. Pulling Your Teammates’ Work
You are not working alone. Before you start each session:
- Open GitHub Desktop.
- Click Fetch origin.
- If new commits exist on GitHub, click Pull.
This updates your local files with your teammates’ latest work.
Important
Pull before you start coding each day. This reduces merge conflicts and keeps everyone aligned.
8. From “Student GitHub” to “Professional GitHub”
So far: you can clone, edit, commit, push, and pull.
In many student projects:
- Everyone has Write access to
main. - Every push goes directly into
main.
In professional teams:
mainis often protected.- You cannot push directly to
main. - You work in branches and use Pull Requests (PRs).
Tip
You can already start using this professional model in class projects, even if GitHub doesn’t force it. Just agree as a team to use branches + PRs.
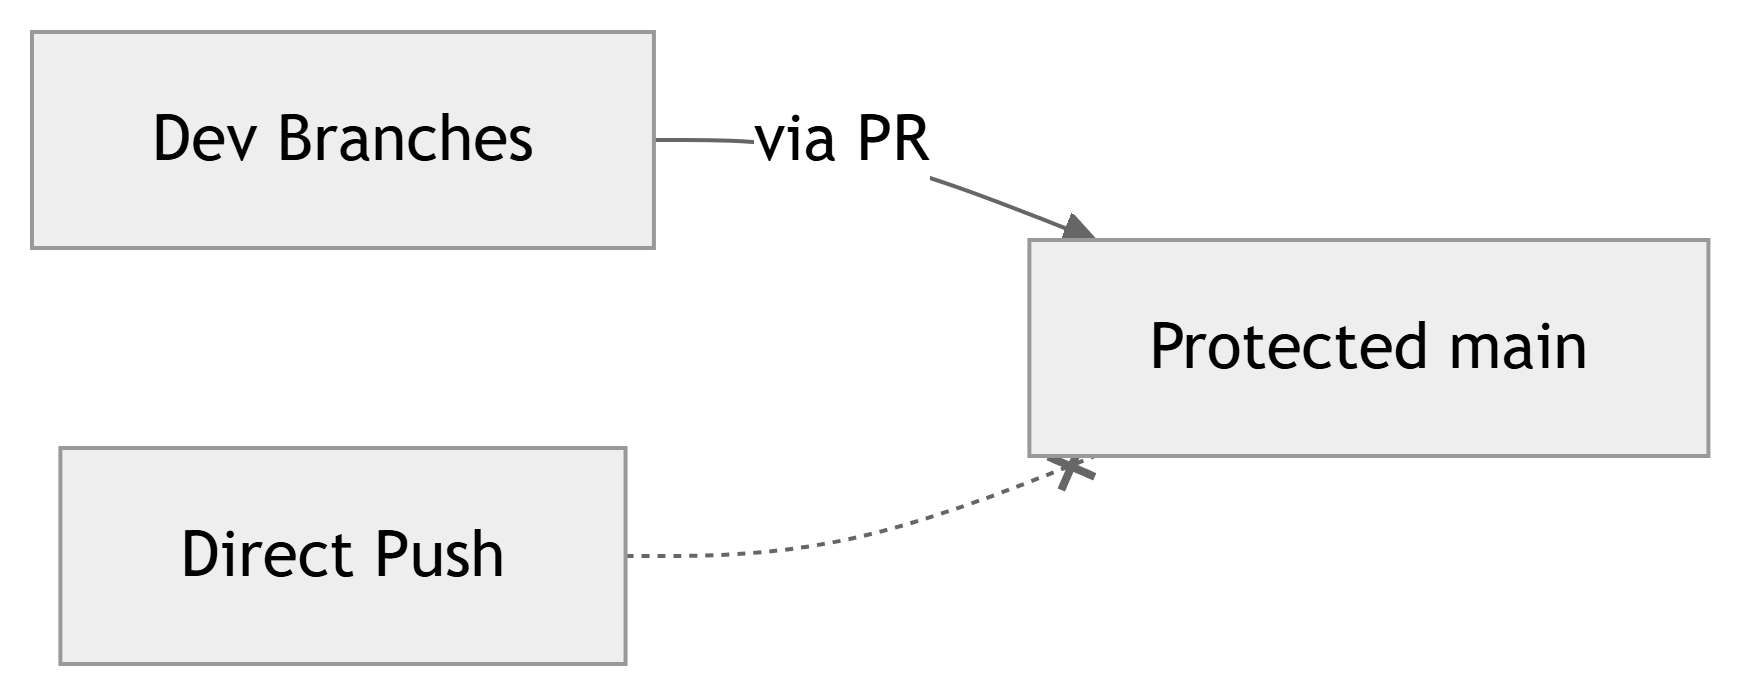
9. Protected Branches: Guarding main
A protected branch (usually main):
- Rejects direct pushes.
- Requires all changes to go through a Pull Request.
- Can require:
- At least N approvals.
- Status checks (e.g., automated tests) to pass.
Important
On real engineering teams, main often represents production code:
- Deployed firmware.
- FPGA bitstreams.
- Released software versions.
10. Branches: Working on Features Safely
Instead of pushing to main:
- Create a feature branch for each task.
- Name it clearly, e.g.:
feature-login-uibugfix-adc-saturationlab3-filter-implementation
Typical workflow:
- Start from up‑to‑date
main. - Create a new branch.
- Commit changes into your branch.
- Push your branch to GitHub.
- Open a Pull Request from your branch into
main.
11. Creating a Branch (GitHub Desktop)
In GitHub Desktop:
- Make sure you’ve pulled the latest
main. - Click Current Branch → New Branch.
- Enter a descriptive name, e.g.,
feature-sensor-readout. - Base it on
main. - Click Create Branch.
You’re now on that branch:
- Changes and commits belong to
feature-sensor-readout.
Tip
Include your initials or issue number if helpful: feature-sensor-readout-az or issue-42-sensor-calibration.
12. Making and Committing Changes on Your Branch
On your feature branch:
- Open the repo in VS Code.
- Implement your change:
- Example: add a new module
sensor.candsensor.h. - Or modify
main.pyto add plotting.
- Example: add a new module
- Save your files.
Then in GitHub Desktop:
- Confirm you are still on your feature branch.
- Review the list of changed files.
- Write a descriptive commit message.
- Click Commit to <your-branch>.
- Click Push origin to push the branch to GitHub.
13. Opening a Pull Request (PR)
Once your feature is ready:
- Go to GitHub in your browser.
- Navigate to your team repository.
- GitHub often shows a banner:
- “Compare & pull request” for your recently pushed branch.
- Click New pull request if needed.
- Set:
- Base branch:
main(or the protected branch). - Compare branch: your feature branch (e.g.,
feature-sensor-readout).
- Base branch:
- Write a clear title and description:
- Title:
Add temperature sensor readout. - Description: what changed, why, any test results.
- Title:
Note
A PR is a request for review, not just a “merge button.”
14. Who Reviews Your PR?
In a three-person team:
- Authors: the person who wrote the code opens the PR.
- Reviewers: usually the other two teammates.
- In some courses:
- Instructor or TA may also act as a maintainer.
GitHub settings can:
- Require 1 or 2 approvals before merging.
- Block self-approval (you cannot approve your own PR).
Important
Cultural rule used by many teams: > “No one merges their own code without review.”
15. Review and Acceptance Flow

Detailed steps:
- Student A pushes
feature-login. - Student A opens PR → target
main. - Students B and C review:
- Comment on code, request changes, or approve.
- When approvals + checks are satisfied, Merge button turns green.
- A maintainer (or the author, if allowed) clicks Confirm merge.
16. What Reviewers Actually Do
Reviewers should:
- Read the PR description.
- Scan the files changed tab.
- Check for:
- Logic bugs.
- Style consistency (naming, formatting).
- Missing tests or documentation.
- Safety issues (e.g., unbounded loops, unchecked I/O).
- Use comments to ask questions or suggest improvements.
Common GitHub review actions:
- Comment — leave general or line‑specific feedback.
- Request changes — PR must be updated before approval.
- Approve — PR is ready to merge.
Tip
As a reviewer, try to understand the intent: “If I had to maintain this code later, would I understand what it does?”
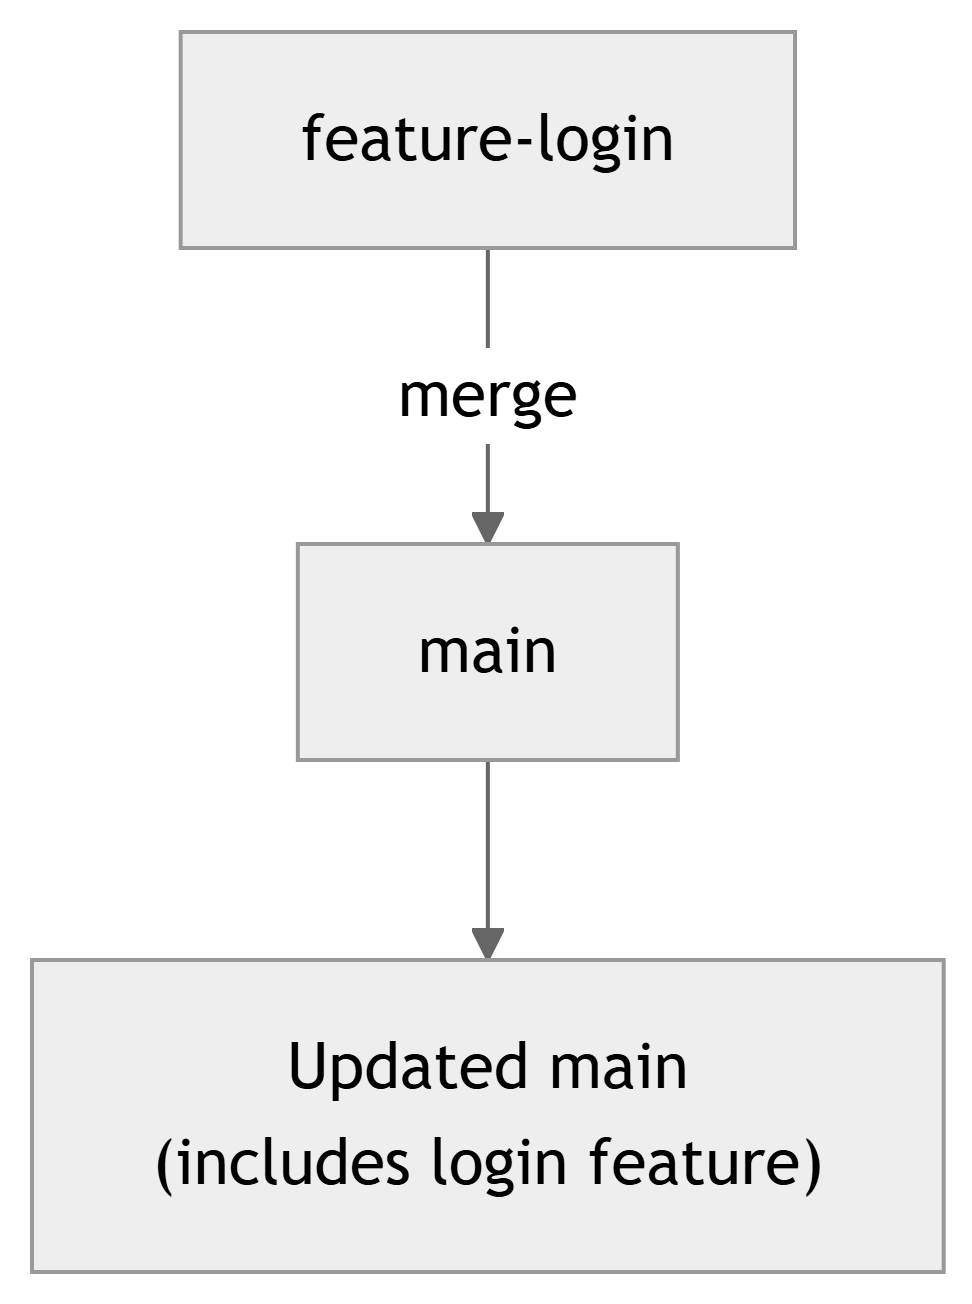
17. Merging the PR
After approvals:
- The PR status will show all required checks green.
- The Merge button becomes active.
- Click Merge pull request → Confirm merge.
Result:
- The feature branch code is combined into
main. mainnow has the new functionality.- Optionally, delete the feature branch to keep things tidy.
18. Handling Merge Conflicts
Conflicts happen when:
- Two people edit the same line of a file in different ways.
- Git cannot automatically decide which version to keep.
GitHub will:
- Block the merge.
- Mark the PR as having conflicts.
The person attempting to merge must:
- Pull the latest
main. - Merge
maininto their feature branch locally. - Resolve conflicts in affected files (choose/merge code).
- Commit the resolved changes.
- Push the updated branch.
Warning
Ignoring conflicts is not an option—Git will not merge until they are resolved.
19. Example Scenario: Team of Three
Let’s walk through a complete cycle:
- Student A: implements “login” feature on
feature-login. - Student B: implements “dashboard” on
feature-dashboard. - Student C: fixes “sensor bug” on
bugfix-sensor.
Each student:
- Pulls latest
main. - Creates a new branch.
- Commits and pushes their work.
- Opens a PR into
main. - Reviews at least one teammate’s PR.
Question for students: How would you decide who reviews which PR to balance workload?
20. Real-World ECE Application Example
Imagine your team is building a signal acquisition and processing pipeline:
- One student works on ADC driver (branch
feature-adc-driver). - Another on DSP filter (branch
feature-dsp-filter). - Another on data logger (branch
feature-logging).
Professional workflow:
- Each feature in its own branch.
- PR for each feature.
- Team reviews each PR for:
- Sampling rate assumptions.
- Overflow/underflow in fixed‑point math.
- Correct interface between modules.
Protecting main ensures:
- The version running on actual hardware is always tested and reviewed.
21. “Best Practice” Rule for Your Team
Even if your instructor allows direct pushes to main, adopt this team rule:
No one merges their own code into
mainwithout at least one teammate’s review.
This helps you:
- Catch bugs early.
- Share knowledge of each part of the codebase.
- Practice professional workflows you’ll use in internships and jobs.
Tip
Write this rule in your repository’s README.md as part of your team contract.
22. Quick Practice Checklist
Before next lab, try this with your team:
- Ensure everyone can:
- Sign in to GitHub.
- Access the Organization and team repo.
- Each person:
- Creates a personal branch.
- Makes a small change (e.g., add your name to a
TEAM.mdfile). - Commits and pushes.
- Opens a PR into
main.
- Pair up and review each other’s PRs.
- Merge the PRs and pull the new
main.
Summary / Key Points
- You work within a GitHub Organization and a shared team repository.
- Use Git, GitHub Desktop, and VS Code to:
- Clone the repo, edit locally, commit, and push.
- Always pull before starting work to sync with your teammates.
- Professional workflows rely on:
- Protected main branches.
- Feature branches for changes.
- Pull Requests for review and controlled merges.
- In a PR workflow:
- Authors push to branches and open PRs.
- Reviewers approve or request changes.
- Conflicts must be resolved before merging.
- Adopting “no self‑merge to main” prepares you for real engineering teams.